How to blur the background of a photo in Pixlr
It is a common thing to see a photo which has a specific subject focus. For example, there is a photo with a wide subject, but it is shot only specific part only or just focus on one of the subjects. This type of photo definitely is the result of a specific editing process. This because the weakness of digital camera, especially with small sensor such as 35mm (24mm x 36mm) is having a big depth-of-field. As the result, you will see that everything is on a one focus. It doesn’t care which part you want to take on the shoot subject.
If you get used to with Adobe Photoshop, Paint Shop Pro, or GIMP, you can also create such kind of photo easily and in this post, we’ll learn how to focus attention on your subject by blurring the background using Pixlr editor.
1. Step one Preserve your original file. If you haven't already done so, go to Pixlr editor and upload your photo from "open image from computer"

2. Create a Background copy layer. You can see from the bar menu and choose “Layer" then click "Duplicate Layer"
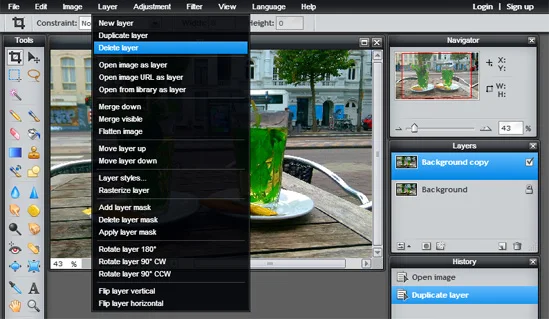
3. Add layer mask to Background Copy Layer. Go back to bar menu and choose "Layer" - "Add layer mask".

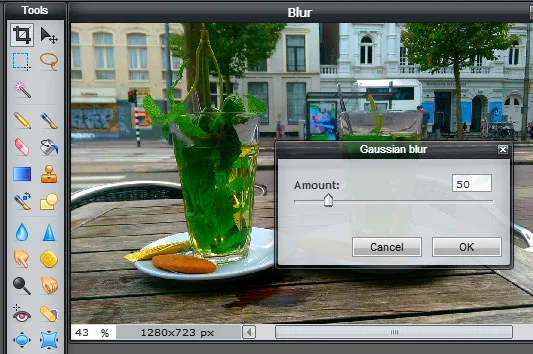
4. Apply the blur. From the Filter drop-down menu at the top of the screen, choose "Filter" - "Gaussian Blur", then apply to a layer mask. You can change the pixel radius and the thickness blur from the pop-up tab dialogue. In this example, it uses 50% amount.
5. Bring up the blur effect. Because the blurred Background copy layer is blocked by layer mask, so you need to show the blur part of the layer mask becomes visible. To use it is very easy. Just click "Gradient tool" - select radial type and the Foreground to Background gradient..

6. Draw the gradient line on the photograph in the work area. Start the line at the point where you want the blur to start. If you draw a short line, the transition from in-focus to out-of-focus will be rapid. If you draw a long line, the transition will be more gradual.

7. Use the Eraser Tool (E) to remove the entire blur from the subject you want to focus until the image looks clearer. To make it easier, change layer mode to "Difference" and then erase a blurred on the subject.

8. If it is finished, bring back layer mode to normal, Apply layer mask and combine the background copy with the original photo by using layer - flatten image - save image menu. Done!

There are 3 different styles of blur on Pixlr that can be used.
If you get used to with Adobe Photoshop, Paint Shop Pro, or GIMP, you can also create such kind of photo easily and in this post, we’ll learn how to focus attention on your subject by blurring the background using Pixlr editor.
1. Step one Preserve your original file. If you haven't already done so, go to Pixlr editor and upload your photo from "open image from computer"

2. Create a Background copy layer. You can see from the bar menu and choose “Layer" then click "Duplicate Layer"

3. Add layer mask to Background Copy Layer. Go back to bar menu and choose "Layer" - "Add layer mask".

4. Apply the blur. From the Filter drop-down menu at the top of the screen, choose "Filter" - "Gaussian Blur", then apply to a layer mask. You can change the pixel radius and the thickness blur from the pop-up tab dialogue. In this example, it uses 50% amount.

5. Bring up the blur effect. Because the blurred Background copy layer is blocked by layer mask, so you need to show the blur part of the layer mask becomes visible. To use it is very easy. Just click "Gradient tool" - select radial type and the Foreground to Background gradient..

6. Draw the gradient line on the photograph in the work area. Start the line at the point where you want the blur to start. If you draw a short line, the transition from in-focus to out-of-focus will be rapid. If you draw a long line, the transition will be more gradual.

7. Use the Eraser Tool (E) to remove the entire blur from the subject you want to focus until the image looks clearer. To make it easier, change layer mode to "Difference" and then erase a blurred on the subject.

8. If it is finished, bring back layer mode to normal, Apply layer mask and combine the background copy with the original photo by using layer - flatten image - save image menu. Done!

There are 3 different styles of blur on Pixlr that can be used.
- Average: This blur tool allows you to take the average color inside your selected area and blur it. It creates smooth transitions.
- Gaussian Blur: This is easy. Use this tool to adjust the amount you want your image to blur. There will be a little pop-up box with a slider to do so.
- Box Blur: This blur type reads the average color value of your selection and then of pixels next to your selection. It blends them together to make it a nice smooth, line-free, blur.